This stone-cold classic features a variety of cool techniques, all applied to a simple set of chords.
To master this song, you will need to apply some of the following techniques:
We can also take the song further beyond the basic riff and chord structure. At several points in the song, lots of lead guitar solo's weave in and out of the picture. We can practice some basic improvising using certain keys to get close to what we hear in the original song - this is a lot more creative and constructive than learning every single note exactly how it was done on this recording.
Further to that, a third section of the song lets us explore the idea of "transposition", where a chord shape has been moved up higher than where it normally gets played, to fit with the music around it.
For now, let's start with the fun bit!
To master this song, you will need to apply some of the following techniques:
- Alternate picking over chords
- Hammer-on's, Pull-off's, and Slides
- Accurate and tight time-keeping
We can also take the song further beyond the basic riff and chord structure. At several points in the song, lots of lead guitar solo's weave in and out of the picture. We can practice some basic improvising using certain keys to get close to what we hear in the original song - this is a lot more creative and constructive than learning every single note exactly how it was done on this recording.
Further to that, a third section of the song lets us explore the idea of "transposition", where a chord shape has been moved up higher than where it normally gets played, to fit with the music around it.
For now, let's start with the fun bit!
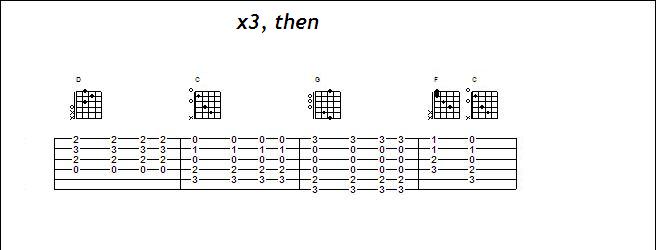
Intro
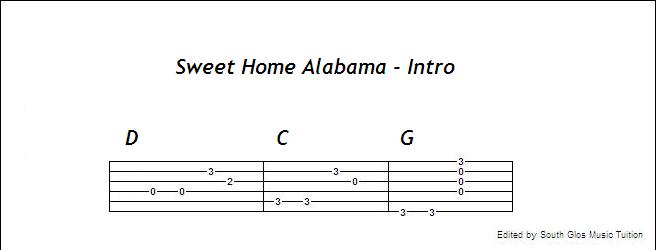
Start off with a standard D chord shape, and pick the individual strings as indicated above (the bar called "D").
Move your middle finger up to the A string, 3rd fret, and remove your first finger. Pick the strings as shown in the second bar ("C").
Now simply move your middle finger up a string, and the third finger down a string, and we have G.
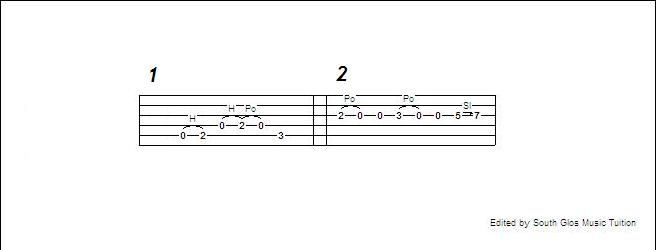
After we have played the first round of chords, we play bar "1" - a hammer on, another hammer on joined to a pull-off, and a snappy note on the 3rd fret of the A string.
Repeat the chords in the first line, then play the bar marked "2" - a pull-off followed by an open string, then again, and finally a slide.
Move your middle finger up to the A string, 3rd fret, and remove your first finger. Pick the strings as shown in the second bar ("C").
Now simply move your middle finger up a string, and the third finger down a string, and we have G.
After we have played the first round of chords, we play bar "1" - a hammer on, another hammer on joined to a pull-off, and a snappy note on the 3rd fret of the A string.
Repeat the chords in the first line, then play the bar marked "2" - a pull-off followed by an open string, then again, and finally a slide.
Verse
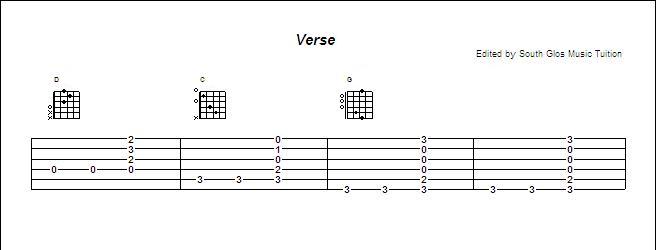
This simple section constitutes large parts of the song. We have our three main chords, D C and G, played in a rhythmic fashion that locks in with the drums and bass guitar.
Hold down a D chord, and hit the open D string twice, followed by a full strum of the chord.
Repeat with C, using the A string note.
Repeat with G, using the E string note, twice.
Think: D, C, G, G (The G chord is two bars long).
When you get the chords changing smoothly, and you start to lock in to the drums and bass guitar, try adding a little bit of palm muting to the first two notes in each bar, releasing the mute for the full strum.
Chorus
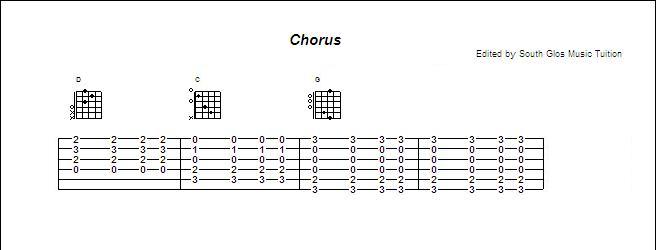
The chorus of this song relies on the the same three chords we already established in the Intro and Verse - D C and two bars of G, but with a more open strumming pattern that lifts the section up above the other parts.
For the first three repetitions of the chorus, strum each chord like this:
Down - - - Down - Down Up
The fourth repetition is almost identical, but the very last bar hits F and C once each, meaning we play D, C, G, then F - C.
Listen to the chorus on the video to try and spot that F - C bit at the end!
By the way, did you notice the fancy sounding bit that we didn't look at yet, after the first verse?
Break
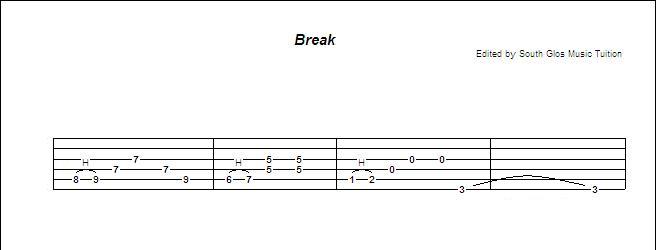
This fancy little slice of guitar comes in after the first few lines of singing, before the first chorus.
Let's start with our first finger at the 7th fret, ready to hold some notes at that fret. The middle finger will hold the 8 on the A string that is played first, and the ring finger hammers on to 9.
For the second bar, we just move the whole shape backwards to frets, and hit those two middle strings together instead of separately as in the last bar.
The final bar can begin on the first finger, using the middle finger to hammer on. Let that last note ring out for a whole bar.
This part is bought to you via the magic of "transposition". Remember that we are mostly playing D C and G?
Well, let's imagine we've moved a G chord up the neck by 7 frets, and counted as we go. From G, one fret up is G#, two frets up is A, three frets up is A#... and so on. When we reach 7 frets up, we are now in the pitch of D, and we should be in the position to play the first bar shown above.
What is lower than D by two frets? That's right, C! And thus we have our second bar, which harmonically matches with the C chord underneath it.
The final bar is easily identifiable as being based around a G chord, which is of course then chord behind this bar.
Country music is full of wonderful examples of lead instruments "playing over the chord changes" like this; the notes used for solo and riff sections are actually built out of the chords behind them. Therefore, everything matches harmonically, melodically, and often rhythmically too. Of course, many of the best players know exactly when and how to use notes and rhythms slightly outside of the supporting chords, such as the first note of each bar in this riff; the minor note for each chord! It only makes a very brief appearance before it gets hammered on to the "correct" note (the major note), creating a slur effect that is a key feature of Blues music, amongst many other styles!
Download a file with all the tabs above compiled into a single sheet right here:
| Sweet Home Alabama Tab |

 RSS Feed
